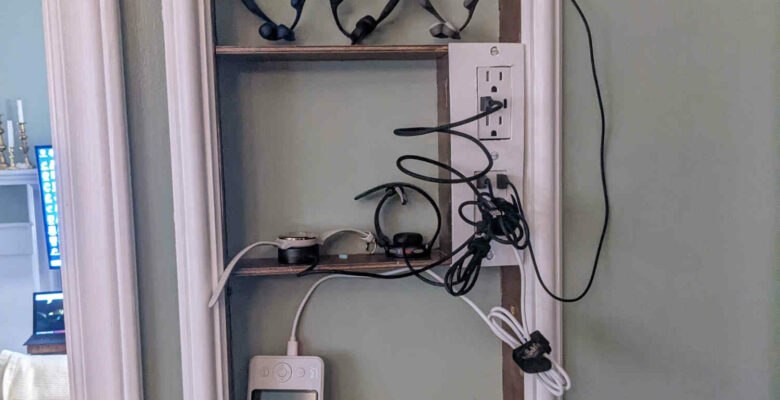
An electronics charging station is incredibly handy to have! If you’re anything like me, you have small electronics plugged in all over the place. We had my cell phone and portable battery packs charging on my nightstand. Then we had my headphones and watch charging on the dining room table. Next, we had the baby monitors on the counter. My tablet charged in the closet.
If my stuff isn’t enough, my wife also had her own small electronics. Combine all of these together and you end up with a lot of wires all over the place. The solution? A central electronics charging station.
This is about the station I made, but you have lots of options on how to do this. Solutions can range from a simple dedicated spot on the counter to my cabinet.
Goals
The goal of this project was pretty simple. I wanted to consolidate all my small electronics in one place to eliminate miscellaneous wires running everywhere. Instead of putting them all in a closet, counter, shelf, or table, I wanted a place out of the way. Fortunately, we had the perfect spot. Our house came with an oversized security control panel. We didn’t need it because we use a different security system.
Designing an Electronics Charging Station
Firstly, I had to design my electronics charging station. To do this, I needed to know the space available and what I needed to store in it. What I needed to store was easy:
- Running watch x2
- Headphones x4
- Tablet
- Cell phones
- Baby monitor
- Portable battery packs x4
The space available was harder because I wanted to put this in the wall between the studs. Although studs are typically 16 inches off center (gives you 14.5″ normally), you can’t ever rely on this. I had to cut a hole first. For whatever reason, the distance between these two studs was 11 13/16″. That gave me a little less room to work with, but it is better knowing before I build the compartment.
Because I had the space, I also made it 2 feet tall. That was a design choice because I had plenty of vertical space to work with. I chose 2 feet because otherwise the station would look too long and skinny.
With all my projects, I design it on paper first, tinker with it, lose what I wrote it down on, and design it again. This one ended up as a 3 shelf station with 2 outlets. The outlets I chose were heavy on the USB since everything we use charges using USB right now. All of the ports are fast charging. Two of them can power a laptop with USB-C.
Building
The building stage was easy. Cut out all the pieces and glue them together. Then stain and paint the whole thing. For my materials, I used quarter inch plywood for each shelf and the walls and ceiling. The back is half inch plywood so I can screw hooks into it.
The hardest part was the wiring. I had to snake a new wire from an outlet on the wall below it and into the two boxes in my electronics charging station. Because these outlets have USB, they take up more space in the box than normal. That means I had a lot less space for the wires and wire connectors, all of which have to be safely secured in a box.
I got all that run and connected only to find out one of the neutral wires slipped out of the connector. Always test your outlets! That made the second USB outlet not work but still test live. Wiring is my least favorite part of any house project. Anyway, I got that fixed.
Aesthetics
After I built the box and installed it in between the studs (it was a snug fit!), I had only a few things left.
Firstly, I had to patch the drywall holes I made. This is never a fun job, but if you do it right you won’t know there were holes there at all.
Secondly, I put up trim around the compartment. I used chair rail because it is thinner than window trim.
Thirdly, I had to make a custom outlet cover because I put my outlets vertical instead of horizontal. That wasn’t too hard, but you have to be exact with your cutouts and screw holes. To make it easier, I used a piece of paper and traced over the outlets and marked where the screws go. This template allowed me to score the plywood with a knife before I cut anything.
Finally, I touched up everything. Nail holes needed spackle, Little bits of paint needed to be cleaned. All those fine last steps make a huge difference in making a project look complete.
As you can see, it all turned out really well! I’m very excited to have an electronics charging station that will serve us well for many years!


Leave a Reply